Task one; In camera technique examples.
Before the development of complex photo editing programs like photoshop, photographers used to use a range of techniques that they would use while taking the photograph to give the photo a certain effect, like a vignette effect and a certain blur in one part of the photo. Effects like these could be achieved with certain everyday things like cling films and Vaseline to create effective in camera effects.
 I had a look on the internet at what examples of photographers using these techniques there was out there and I found these
Here is an example of a photographer holding a piece of something coloured over the lens to tint the whole of the photo.

Vaseline on the camera lens to create a soft focus effect.
 Here is an example where a photographer has used cling film on the lens to create another soft focus effect.
  Here is an example of where a photographer has used an in camera vignette effect in his photo.
  Another in camera effect you can do is a technique called bokeh. Bokeh is where you use a short depth of field, and knock the camera way out of focus and you get big circles and specs of light, like this.
Another thing you can do with the Bokeh effect is change the shape of the aperture, this changes the shape of the specs of light.

These in camera effects have been used quite alot in films and tv shows, for example in the film 'Scott pilgrim vs the world' here they'd changed the shape of the aperture to a heart shape.
Task three; research on digital ways to reproduce the in camera techniques.
Here I had a look at ways to reproduce these effects in photoshop and got examples of where photographers had done this to their photos.

For the first photo, they created a tinted photo effect using a coloured acetate, by using photoshop and turned the photo black and white then clicked the 'tint' tick box then tinted the photograph.

For the second and third photograph they use Vaseline and cling film to create a soft focus effect on the picture, to do this in photoshop the photographer would have used one of the blur effects in photoshop then erased it over the bit they wanted in focus.
 Here I had a look at a photographer who had later added an vignette effect in photoshop, using a new later in black then rubbing parts slowly out of the photo.
  Here I looked for an example where the photographer had reproduced a bokeh effect in photoshop. Here's a link to a tutorial on how to do this effect. http://www.junkiee.net/tips-tricks/bokeh-examples-textures-create-a-perfect-bokeh-effect/
 Here is an example of where a photographer has reproduced the bokeh affect with a different shaped aperture.
 Task two and four; Here I had to produce some examples of me using some in camera effects (task 2) then show examples of me recreating these in camera effects using photoshop (task 4) I decided to do them in the same section so that I could show how each technique, in camera and photoshop, would compare to eachother.
Coloured tinting.
 Here I firstly had a go at the tinted pictures, I couldn't get a hold of any acetate so I put a layer of cling film on the lens then coloured it in with felt pen, this really didn't work very well as the felt pen went all streaky, but it'll show if I wanted to do this in camera affect in the future it'd be better and more effective to use acetate.
 Here I had a go at reproducing the tinted effect in photoshop, I found this way far more effective.
Soft focus.
 Next I had a go at doing the soft focus photographs. Here I used cling film over the lens pulled tights, then used Vaseline to go around the lens. The cling film was quite hard to keep on over my lens but in the end I think gave a quite nice effect.
 Here I used a Gaussian blur in photoshop, then rubbed out parts of it giving the picture a soft focus effect.
Vignette.
 Here I had a go at reproducing a vignette effect by drawing with black felt pen onto a layer of cling film over my lens, It didn't go that well I don't think because the pen went all streaky.
  I next had a go at reproducing the vignette effect in photoshop, I think this worked out alot better than my in camera effect one.
 Bokeh effect.
 Here I had a go at creating a bokeh effect by setting my camera on a low f number and knocking my camera out of focus.
  Here I had a go at reproducing a bokeh effect in photoshop, using the tutorial I pasted earlier, after about an hour of trying I managed to come up with this, which I'm pretty happy with.
  Here I had a go at the shaped aperture bokeh effect, I used a heart shaped one and a star shaped one, these took ages to get at first, but I managed in the end.

Here I used photoshop to try and reproduce this shaped aperture effect, I followed the tutorial again above but used a different shape, I'm pretty happy with this outcome, but I think after I did it a few times, with practise, they'd get better.
Health and safety issues for task four.
When taking the pictures of the bokeh, I had to make sure I didn't trip over the tripod and that it was sturdy, and when taking them in a dark room I had to make sure there was nothing that I'd trip up over or anyone else. Making sure that if there's kids in the area that you're shooting in that, they couldn't get hold of anything little or trip up on anything. That when using big studio lights that all wires are tapped down and everything plugged in correctly so there is no hazard of things setting on fire. To stop the lights over heating, it's good to have a fan on in the studio, and to make sure cables aren't damaged and replace them if they are. It's also relevant that you don't have exits blocked incase you had to leave the studio in a rush. Right posture is needed when working at computers and regular breaks are recommended to stop eye strain.
When taking the pictures of the bokeh, I had to make sure I didn't trip over the tripod and that it was sturdy, and when taking them in a dark room I had to make sure there was nothing that I'd trip up over or anyone else. Making sure that if there's kids in the area that you're shooting in that, they couldn't get hold of anything little or trip up on anything. That when using big studio lights that all wires are tapped down and everything plugged in correctly so there is no hazard of things setting on fire. To stop the lights over heating, it's good to have a fan on in the studio, and to make sure cables aren't damaged and replace them if they are. It's also relevant that you don't have exits blocked incase you had to leave the studio in a rush. Right posture is needed when working at computers and regular breaks are recommended to stop eye strain.
Task Five.
Here I have to choose three different images with traditional in camera effects, then reproduce them.
Below is the first image I have chosen to copy.
Below is the first image I have chosen to copy.

To achieve this look as an in camera effect, I needed to use a light box and a blue filter.
At first I thought I would be able to achieve this blue look by just changing my white balance, but as you can see below although it did change the photo to slightly blue, it wasn't anywhere near what I wanted to achieve.

Next I tried using a blue filter infront of my camera, but at first I couldn't get the shutter speed correct and my photo ended up too dark. Below is a few pictures of where I'd try different shutter speeds before I found a good one to use.


Below is the image I was most happy with.

Here is my second image that I intend to copy.

To achieve this in camera effect, I will place a layer of cling film over the lens of my camera, then put vaseline around the edges to create this soft focus effect. Then I changed the image to black and white in Picasa.

Here is my third image I intend to copy.

Here is my third image I intend to copy.
To achieve this effect, I will need some fairy lights and a jam jar, I will set my camera on a low depth of feild and on super macro when focusing on the jar to create the bokeh effect behind.
I couldn't find a jam jar to do this image with, so I used a tea cup instead, I had trouble getting a low depth of feild and these were the biggest bokeh effect I could get while still having the tea cup in focus. I would like to develop this bokeh further in later tasks.


Task Six.
Here is my first picture for my set of college themed images.
this first one I used the editing technique of gausian blur
I chose to take a picture of being on the bus because it's something that most college students do everyday in order to attend the college. I blurred out the sides of the photo as if everything is zooming past them, how some people feel in life when everything over whelms them, and also how coming to a big city every day may make you feel lost.
For my next picture, I chose an image of a advert stand with advertisements for music on. I took this because music means alot to people and it can help you through alot of tough times and alot of young people focus on music so much in their life, hence why the background is blured out.
I couldn't find a jam jar to do this image with, so I used a tea cup instead, I had trouble getting a low depth of feild and these were the biggest bokeh effect I could get while still having the tea cup in focus. I would like to develop this bokeh further in later tasks.

Here is my redo of the image that I explained in a later task :)

Task Six.
Here is my first picture for my set of college themed images.
this first one I used the editing technique of gausian blur
I chose to take a picture of being on the bus because it's something that most college students do everyday in order to attend the college. I blurred out the sides of the photo as if everything is zooming past them, how some people feel in life when everything over whelms them, and also how coming to a big city every day may make you feel lost.
For my next picture, I chose an image of a advert stand with advertisements for music on. I took this because music means alot to people and it can help you through alot of tough times and alot of young people focus on music so much in their life, hence why the background is blured out.


After thinking about it, I decided I could do some better more suited images for the task, but have kept these in to show my thought process and that I tried out different things, here are my final images below and a contact sheet.
Here are my final images that I am yet to edit in photoshop.
I decided to take images of objects on my white table, that have things to do with teenagers and what they do.
I did the earphones because of a teenagers love for music
The games controller because games consoles are really popular with teens
I did the earphones because of a teenagers love for music
The games controller because games consoles are really popular with teens
The phone because teens are known for texting alot
The sweets to represent how much junk teenagers are meant to eat and are known for eating.
The sweets to represent how much junk teenagers are meant to eat and are known for eating.
The bottle of Jack Daniels because teenagers go out drinking alot
and the glasses and the book because of the amount of work that teenagers do from college :)
I am not sure how I intend to edit these images yet, but I want them all to have the same look about them.
I am not sure how I intend to edit these images yet, but I want them all to have the same look about them.


For these images I have to use editing techniques I have learnt in this project. I learnt how to give photos a gausian blur in photoshop which made the photo look like it had a really low depth of field. To recreate this effect when taking the picture, I used the lowest depth of field I could, and used an extention tube aswell. For the newly learnt editing technique that I have to include in my photos I plan to add a vignette effect.
Here are my final images, I added a vignette effect in photoshop and contrasted the picture slightly.


Task Seven.
I think I managed to do the tasks quite well, I think I managed to collect a variation of different camera techniques and replicate them in task 1-4. I am most happy with my pictures of my lilys the ones that I copied I think I managed to do this quite well. I think I managed the copy the look and techniques of the image really well especially the vaseline one. The things that I didn't think went well were my college images, even though I managed to fit the editing techniques that I learnt into them, I had trouble thinking of ideas that really showed off the idea of college well. The things that I didn't think went well were my attempts at bokeh, I would love to try and practise this later as I really love the technique. I really liked my computer made bokeh pictures, I followed quite a detailed photoshop tutorial for it and after about an hour of attempting it, I think I really managed to achieve the bokeh look. Some of the materials I tried out, like pen on cling film on the lens weren't effective but others like vaseline on the lens worked really well I think.
I think I managed to do the tasks quite well, I think I managed to collect a variation of different camera techniques and replicate them in task 1-4. I am most happy with my pictures of my lilys the ones that I copied I think I managed to do this quite well. I think I managed the copy the look and techniques of the image really well especially the vaseline one. The things that I didn't think went well were my college images, even though I managed to fit the editing techniques that I learnt into them, I had trouble thinking of ideas that really showed off the idea of college well. The things that I didn't think went well were my attempts at bokeh, I would love to try and practise this later as I really love the technique. I really liked my computer made bokeh pictures, I followed quite a detailed photoshop tutorial for it and after about an hour of attempting it, I think I really managed to achieve the bokeh look. Some of the materials I tried out, like pen on cling film on the lens weren't effective but others like vaseline on the lens worked really well I think.
Task Eight.

Here, I have to expand on the topics I covered in earlier tasks and experiment with re shooting them, so here I decided to have a go at getting better at bokeh. Here is an image I did with taking an image of a christmas tree
Here I had to mess about with the shutter speed and ISO because my image kept coming out over exposed like this.

Here is another example of where I tried to use the bokeh effect. practising good shutter speeds and ISO's for this will help me later if I intend to use this for one of my images.

Task Nine.
For my next set of images, I would like to try and have another go at having something in focus of the camera and then a bokeh effect in the background, I had so much trouble with this before, though I plan to keep experimenting till I achieve an acceptable image. I plan to set up the tea cup on a stand infront of my camera, then have the fairy lights on a black sheet quite far behind the tea cup till I get a bokeh effect when I focus on the teacup. For this to work unlike my other attempts I am going to try and see if I can use my little macro attachments and on super macro on my camera to try and get as smaller depth of field as possible.
Task ten Final image.

Task Eleven.
For my image for task ten I am pretty happy with my photograph, but in the end I ended up having to photoshop the background, because even with my macro lens and on super macro setting I still couldn't get the depth of field so small that the lights turned to bokeh, even when I moved the lights far away. So I took an really out of focus image of the lights then put that in with the image of the teacup on photoshop. Even though in the background the lights did kind of bokeh, I still wasn't happy with the image, that's why I decided that to get a really good image I needed to edit it.
So in a way, this is a good image because of how nice I think it looks, but bad because so much editing was used to make it look acceptable. The bad points of this image is that even when I used my super macro setting on my camera, and a macro attachment lens I still couldn't get a low enough depth of field to create an affective bokeh effect, though the good points of this are I now know more about how to put photos together in photoshop like bokeh images. If I have time, I intend to have another go at this image with my new camera which I know will be capable of creating this effect nicely.
Here is the image I managed to come up with with my new camera with a 50mm lens on F 1.8


Here a few days later I had another go trying to make my bokeh images better because I didn't like how out of focus the candle still seemed :) I used a tripod to keep my camera steady and a remote so I didn't shake the camera when I was taking the photos.
I showed my image in task 5 :)
I showed my image in task 5 :)
I put my camera on AV move and used an ISO of 400 and my F number was on 1.8 and I used manual focus.
Here I also experimented with different shaped apertures, here are my images before I edited them


ere I changed the hue of the photographs in photoshop and changed the contrast a bit :)

Task Twelve.
Here I had to think up new ideas of in camera effects, here is what I came up with.


Left; feathers
Right; Dotted condom


Left; Fruit pot
Right; blue glitter paint on a cd case


Left; glitter in a cd case
Right; rainbow net
Right; rainbow net


Left; Lacy patterned tights
Right; Purple clay on a cd case


Left; purple hair dye on a cd case
Right; purple netting
Right; purple netting


Left; Silver spray paint on a cd case
Right; Purple tights
Right; Purple tights


Left; through a bottle
Right; Through neon yellow gloves
Right; Through neon yellow gloves


Left; Black lipstick kiss on tape
Right; through a crystal ball
Right; through a crystal ball
Task thirteen and twenty five (the images.)
For my task 12, I explored lots of different possible in camera techniques, some which were alot more successful than others. For example I really loved the blue glitter paint in the cd case, it gave an vignette effect on the photograph and I think the colour with the glitter added a really nice effect, if this effect was done in a proper photograph shoot, not just a few little snap shots and was done carefully, it could create a really good effect. I also really loved the black tights over the lens, I think this gave the photo a kind of 'old look', I would really love to have ago at this again to see what photos I could create. Ones that I didn't think went as well was the black lipstick kiss on the screen, I think the picture behind the kiss was too complicated for the kiss to show through and if this effect was done with a simpler picture in the background it might have looked better. I thought the white glitter in the cd case would have worked better, but my camera found it difficult to focus on both so it only really focused propely on the glitter so the picture in the background didn't look as good as it could have, maybe there's something I could do to make the picture in the background more in focus if I had another go at this. I decided to try purple hair dye on a cd case because in the earlier tasks to create a colour in the image I tried to use felt tip pen on some cling film but the pen came out too patchy on the picture, so I tried to have a go with hair dye as its like a paste so it could be easily spread about, I think it worked pretty well.
Here like I said, I had another go at the in camera techniques that I think were successful. I am most happy with the blue glitter glue on the cd case, I think it looks really effective.


Task Fourteen
My images photoshopped onto different formats such as buses and bill boards.


Task Fifteen
There are lots of different lenses photographers can use to create lots of different angles ect of photographs, here I will show examples of images taken by photographers with different lenses.
There are lots of different lenses photographers can use to create lots of different angles ect of photographs, here I will show examples of images taken by photographers with different lenses.
Wide angle lens photograph
Fish eye lens photograph

Macro lens photograph
Telephoto lens photography

Here is where I had a go with these different lenses.
Fish eye

Macro

Telephoto

Wide angle

Recreating different lens types in photoshop with this image

Faked macro lens shot

Faked fish eye lens in photoshop

Faked telephoto lens in photoshop

Faked wide angle lens in photoshop

Here is examples of different types of lighting.
Natural lighting

Picture taken with internal pop up flash from camera.

A photograph with bounced flash.
Here I had ago at pictures with different kinds of lighting and flash.
Natural light

Pop up flash

Bounced flash

Task Seventeen
I would like to have my images printed out on a website such as photobox and then I would like to mount them on foam board, cutting them out is quite hard, I will try and be as neat as possible to make them look as nice as I can.
Task Eighteen.
Showing why certain lenses are used for certain situations.
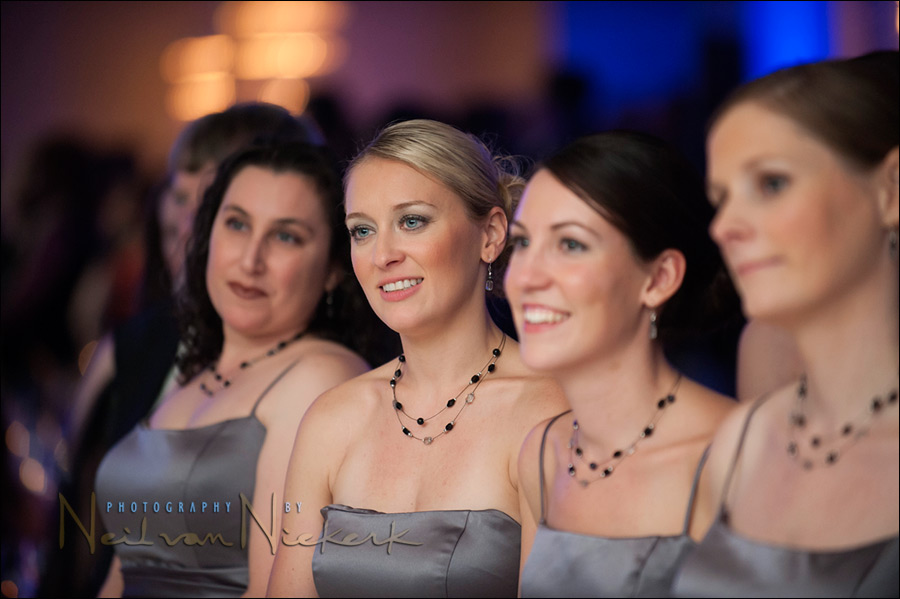
Here's a photo taken with a telephoto lens of a camera, zoomed into my model.

This second picture was taken at the same angle as the first but instead of zooming in on the subject I used a wide angel lens and just took the photo in-front of her.

This Photo taken from underneith my model using the telephoto lens zoomed in on the subjects face.

This photo was taken from the same position but instead of zooming in I just took the photo from right near the models face.

Here I took the picture from above stood on a chair with a telephoto lens and again zoomed in on my model

Here I just got close to my model to take the photo.

After taking these pictures, it is clear that when doing certain photography like portrait photography, it's better to use a telephoto lens and zoom in on your subject than take a picture right up close to them, zoomed in photos make the person appear thinner, and the close up shots give the impression that the model is alot bigger than they actually are. This is why in photo shoots, photographers use really large telephoto lenses to make the model look as best as possible.
It also applied to objects too, here is some examples with a note book.
Picture taken with a telephoto lens, zoomed in.

Picture taken at the same angle with wide angle view.

Task Nineteen


Task Twenty and twenty one.
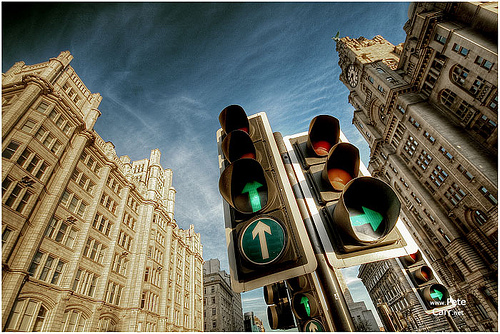
For my final set of images I have decided after looking through images, that I would like to take some fish eye images of some buildings looking up. I couldn't find any specific photographers that only did this or really any pictures that had photographers name with them, but I found these images off the internet, and I would love to have a go at doing something similar for my final images.
The first image was just done with a fish eye looking up at the buildings, but the second image was done differently, most websites with images like this called it their 'little world'
I had a look on the internet to see if I could find a tutorial on how to do this in photoshop.
For my final images I would like to have a go at both images, doing the simple fish eye image of looking up and making a 'little world' both with the buildings pointing in and out.
http://content.photojojo.com/tutorials/create-your-own-panorama-planets/
So I am going to go into Leeds with my fish eye and collect lots of different shots and see which ones I like the best, I think this will be best done at around lunch time, when it's still really light as I really love the blue sky in the first image. I could also have a little go at a few night shots, like the last image, but I think these will be harder to capture, but I'll have a go :)
http://www.autodesk.co.uk/adsk/servlet/index?siteID=452932&id=12223302


Here are the images that I took in millennium square for my panorama photo. I put my camera portrait on a tripod and turned my camera around and took lots of images. I then managed to find a program on the internet that stitched all the photos together, it was called SerifPanoramaPlus. After doing that, I opened up the photos in Photoshop and followed the photoshop tutorial that I linked above. I had to resize the photo and turn it upside for the planet like looking picture and keep it the right way for the other one. I then went onto filter > distort > Polar Coordinates, then selected Rectangular to polar. I then had to delete the black blobs in the middle of the photo using distort > liquefy and dragged the black pixels away from the photo, then smudged the image slightly.


Here are my final images that I am really happy with, I have sent them off to be printed :)


Task Twenty-four


Task twenty three
I decided to have my images printed out through photobox and mount them because I think when done right it looks realy neat. they look really nice on a wall when mounted, they look so much flatter than when an image is just stuck onto a wall. I decided to do this instead of an online presentation because with one of those you can only view them on a electronic device, where as mounted photographs could be stuck up anywhere for people to see.
Evaluation of work.
Looking back through all the work I have done for this topic, I have really enjoyed it all.
Starting from the start of the project testing out lots of different in camera techniques, I found one that I really enjoyed doing, which was bokeh, which I did some images of in eleven, I am really pleased with them. Then when we got to have a go at recreating them in Photoshop, I learnt quite a lot of new things in Photoshop from that. On the next set of tasks we had to pick three images an reproduce them, I really enjoyed doing this, and I think my final images after a bit came out pretty well, because after a bit I really managed to get the bokeh technique with shapes really well. We next had to have a go at taking some images that represented what a students life was like, at first I had such trouble tying to think and came up with a few bad pictures to start with that I really wasn't happy with, but after having a big thing about what I could do, I think I managed to come up with six strong images, representing what students do. Listen to music, play video games, always have their phono with them and are known for always texting, sweets showing that students eat alot of bad food, the alcohol showing that students drink alot then the glasses and book showing that into all of that they still study. I edited them using the technique I'd learnt of adding a vignette effect to the photograph from the in camera and photoshop effects earlier in the task, so this helped alot when editing my images.
Over the next few tasks after this I had alot more goes at the technique of bokeh as this really interested me, I am really happy with the images that I came up with after this, all of the practising I did for this I think was worth it, and I have definitely learnt a new skill.
For the next tasks I had a go at making up some new camera techniques up myself, some of these I am really happy with but some I didn't think really worked. The one I think went well the most is the tights on the lens and the blue glitter glue.
Next I had to photoshop my college images onto different advertisements in the street, I wasn't really happy with how unneat these looked but because I got these images off the internet the images easily pixelated and it was hard to fit my image in neatly, If I was going to do this task again I would take my own photographs of advertisements in the street to put my images on.
Over the next few tasks after that I looked into different types of lenses that photographers use to get different effects in images. I found examples off the internet, took ones of my own and recreated their effect in photoshop. Then we had a look at different types of lighting. Then in the other task I had to show what effect the different type of lenses had on the look of a model in the photograph. I didn't realise the lenses effected the picture so much so this task really helped me, I learnt how to make people in the photograph look slimmer by zooming into them rather than taking the picture of them close.
The next set of tasks is the ones I am most happy with, we had to pick a set of photographs which used a certain lens that we like and use this as inspiration to take a set of our own images, I decided to create my own 'world' using a panorama shot, I am so happy with the outcome. I got these images printed out and I would like to have them mounted on foam board.
Over all I have really enjoyed this topic, and I feel that I have learnt alot from it like what lenses to use in certain situations, techniques in photoshop and my favourite, bokeh.